
Jayanti Katariya
Last Updated: January 23, 2026
Table of Content
Blog Summary:
This guide provides a comprehensive roadmap for migrating from WordPress to Webflow to achieve superior speed, security, and design freedom. We cover essential pre-migration audits, step-by-step CMS and SEO preservation tactics, and expert testing protocols. Learn how to navigate technical challenges and implement best practices to ensure a seamless transition that boosts your search rankings and performance.
Table of Content
For over a decade, WordPress has been the go-to choice for digital creators. Its open-source flexibility allowed bloggers and growing enterprises to build a web presence with minimal technical barriers. It was the “gold standard” for a simpler era of the internet.
However, as the digital landscape has evolved, the “plugin-first” nature of WordPress has become increasingly traditional. Today, many site owners are trapped in a cycle of security vulnerabilities, slow page speeds, and “code bloat” that undermines SEO performance and frustrates users.
This friction has sparked a massive shift toward Webflow. By migrating, businesses are trading clunky, high-maintenance systems for a modern platform that prioritizes clean code, lightning-fast performance, and absolute design freedom. If you’re ready to break free from the limitations of legacy builders, here is everything you need to know about Migrate to Webflow.
Migrating to Webflow means moving your content, design, and functionality from platforms such as WordPress or Squarespace into Webflow’s visual development ecosystem. Basically, it’s a process that involves:
Simply put, migrating means shifting to a “clean code” environment that delivers faster load times and secure hosting. It also provides the freedom to edit visually without relying on heavy plugins.
Modern websites need a balance of high-end aesthetics, lightning-fast performance, and extreme agility. Webflow migration addresses these requirements by replacing the “plugin bloat” of legacy systems with a professional-grade development environment.
Most platforms force you to choose between a rigid template and a lengthy, costly development cycle. Webflow breaks this cycle by offering a “visual-first” approach to CSS and HTML.
Designers can build pixel-perfect layouts without being constrained by pre-defined themes. This means your site can finally look exactly like your brand identity, with custom interactions and animations that would usually require thousands of lines of manual code. It bridges the gap between a design mockup and a functional website, ensuring no detail is “lost in translation.”
SEO is a prerequisite for survival. Webflow builds SEO tools directly into the interface, not on bulky third-party plugins.
Managing blogs, team bios, and case studies becomes a nightmare on fragmented systems. Webflow’s CMS uses “Collections,” which are essentially custom databases you define yourself.
Whether you have ten pages or a thousand, CMS collections allow you to update content globally in seconds. It is designed for collaboration. Your marketing team can draft new posts in a simplified “Editor” view. On the other hand, your designers maintain control over the structure. This separation ensures that your site stays on-brand, even as your content volume explodes.
Security and uptime are the foundations of trust. Webflow hosting is powered by Amazon Web Services (AWS) and Fastly, providing the same enterprise-level infrastructure used by global tech giants.
When you migrate to Webflow, you can say goodbye to plugin updates, manual backups, and server maintenance. By migrating, you’re not just getting a new website; you’re also gaining a scalable marketing engine that lets your team focus on growth rather than maintenance.
A successful migration to Webflow starts long before you open the Designer tool. Proper preparation is the difference between a seamless launch and a digital nightmare. Follow the prerequisites below to ensure your brand’s transition is secure, organized, and optimized for growth.
Before moving a single asset, you must know exactly what you own. Conduct a comprehensive audit to list every page, blog post, and media file. This “content inventory” helps you decide what needs a refresh, what should be archived, and what is critical for the new site.
Never start a migration without a safety net. Export your current database (XML/CSV) and save local copies of all high-resolution images and videos. Having a complete backup ensures that even if something goes wrong during the transition, your original data remains untouched and recoverable.
Migration requires “the keys to the house.” Ensure you have administrative access to your domain registrar (e.g., GoDaddy or Namecheap) and your current hosting provider. You will need these to update DNS records and point your domain to Webflow’s servers when you’re ready to go live.
Protecting your hard-earned search rankings is vital. Create a URL mapping document that pairs your old links with their new Webflow equivalents. This allows you to set up 301 redirects immediately, preventing 404 errors and ensuring Google continues to index your site without a traffic dip.
You Might Also Like:
The prospect of moving your entire website can feel daunting. However, a structured roadmap helps ensure you don’t lose SEO settings or compromise on user experience.
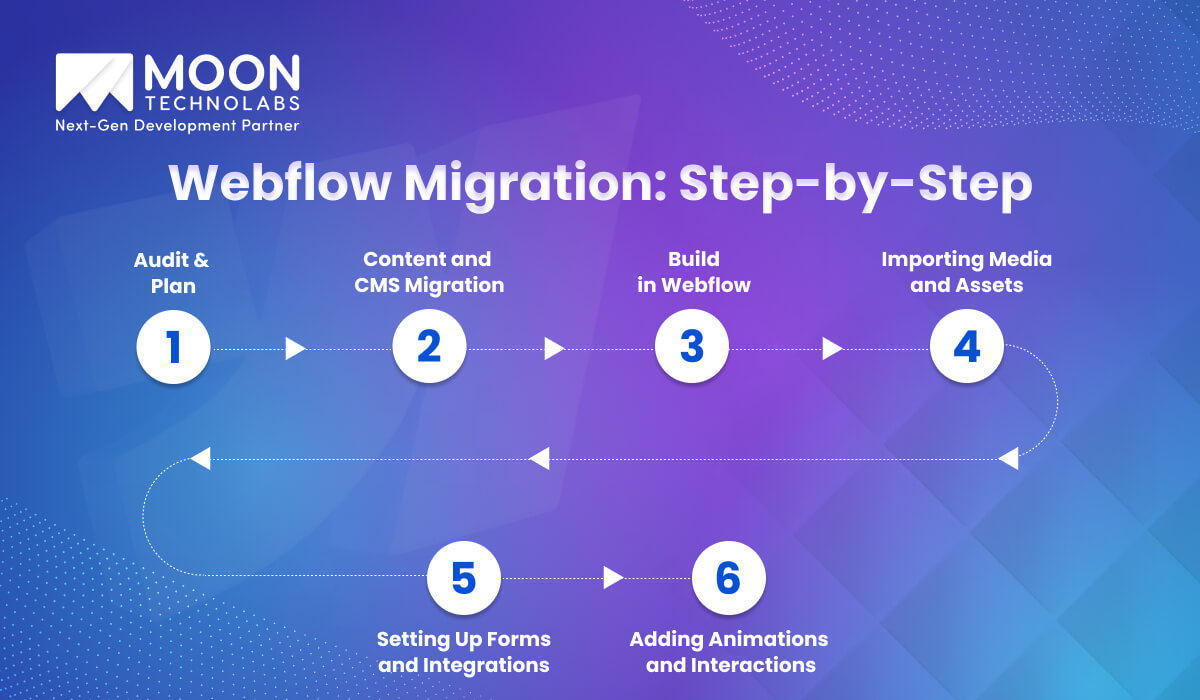
Before moving a single pixel, it’s important to have a blueprint. A successful migration starts with a deep dive into your existing site to decide what stays, what goes, and what needs an upgrade.
First, inventory your entire content structure. To do that, create a spreadsheet listing every page on your current site. Identify high-performing pages that must be preserved and low-traffic pages that can be pruned.
Next is to map your SEO. Document your current URL structures, titles, and meta descriptions. You will need this list later to set up 301 redirects, ensuring that anyone clicking an old link is automatically sent to the new Webflow version without hitting a 404 error. You also need to define your style guide and note your brand colors, typography, and spacing.
The CMS (Content Management System) is the engine of Webflow. If you migrate from WordPress to Webflow, you’ll need to transition your database carefully. Here, you can export WordPress content as a CSV or XML file. Then, clean your CSV file and open your export in Google Sheets or Excel. Ensure that categories, tags, and author names are consistent.
After that, in Webflow, create a CMS Collection that mirrors your old structure. When you import your CSV, you will “map” your old columns (like “Post Body” or “Publish Date”) to your new Webflow fields. Don’t forget to export your metadata. Mapping your existing SEO titles and meta descriptions into Webflow CMS fields ensures you maintain your search engine rankings from day one.
Then comes the creative part. Rather than using a restrictive template, Webflow lets you build visually using CSS and HTML.
A common mistake during migration is dragging over heavy and unoptimized images. This is your chance to fix your site’s loading speed.
Your current website needs to do more than just look good. It needs to work. This step focuses on the functional elements that connect your WordPress site to the rest of your tech stack.
The “Webflow Wow Factor” usually comes from its powerful Interactions tool. This is where you add the finishing touches that make the site feel premium.
If you want to bypass the learning curve and ensure a “pixel-perfect” transition, our professional Webflow development services are here to help. We deliver a high-performance site that’s ready to convert.
Consult Our Webflow Experts Today
The Webflow site operates differently from traditional “drag-and-drop” builders. It is a visual interface for professional coding practices. To migrate successfully, you need to grasp how Webflow organizes data and design through its unique site structure.
Webflow handles your content into two primary categories: Static Pages and Dynamic Collections. Understanding this distinction is essential for developers migrating from WordPress plugins.
One of the biggest mistakes during a migration is rushing into the design before defining your CMS Architecture. Think of this as the “skeleton” of your website. When setting up your architecture, you define Fields for each collection. These fields act as placeholders for specific types of data, such as:
Consistency is the hallmark of a professional website. In Webflow, you achieve this through Components. Components allow you to turn an element or a group of elements into a reusable master asset. If you update the master component, all instances of that component across your site update instantly.
The migration process isn’t truly complete until you’ve secured your search engine rankings. A “lift and shift” approach can cause temporary traffic dips. However, with the right optimization strategy, your Webflow website can outperform your previous platform.
It’s like forwarding your mail to a new address. By mapping your old URLs to your new pages, you prevent users from hitting “404 Not Found” errors. It also ensures search engines transfer your existing ranking power to the new website.
This is about clarity and visibility. Meta tags define how your pages appear in search results, while Schema (structured data) helps Google better understand your dynamic content. Hence, it enables “rich snippets,” such as star ratings or price information, which boost click-through rates.
This focuses on the user experience. Optimize images, clean up unused code, and leverage Webflow’s global CDN to ensure your site loads quickly and remains stable. Both are major ranking factors for Google.
Our experts specialize in technical SEO preservation and ensure that every redirect and asset is perfectly mapped and optimized for lightning-fast load speeds.
Get Performance Optimization Plan
Before you flip the switch, a rigorous testing phase is essential to ensure your new Webflow site delivers a seamless user experience. Migration involves moving many technical parts; a final audit ensures that your design, logic, and integrations remain intact during the transition.
Although Webflow’s internal preview is highly accurate, it cannot perfectly simulate how every device renders code. You should conduct a comprehensive sweep across Chrome, Safari, and Firefox, as well as actual iOS and Android devices.
Moreover, pay close attention to how complex interactions and animations behave on touchscreens versus desktops. It’s common for “hover” effects to act unpredictably on mobile, so ensuring your breakpoints are fluid and your layouts remain “pixel-perfect” on every screen size is vital for a professional user experience.
A site migration often acts as a “reset” for your technical integrations. You must manually test every lead-capture form, newsletter signup, and e-commerce checkout flow to ensure data reaches its destination. If you use automation tools such as Zapier or Make to connect Webflow to your CRM, verify that the field mappings remain accurate. Don’t forget to check the “Success” and “Error” states of your forms; a broken submission process is a silent killer of conversion rates and can lead to lost revenue immediately after launch.
The final step is the transition from your webflow.io staging link to your custom domain. Before pointing your DNS records (A and CNAME) to Webflow, do a final scan for placeholder “Lorem Ipsum” text or broken image assets. Once the domain is connected and the SSL certificate is active, crawl the live site to verify that no internal links still point to the staging environment. Finally, submit your updated XML sitemap to Google Search Console to notify search engines that your new, optimized structure is ready for indexing.
Webflow offers unmatched design freedom and performance, but the transition from a legacy platform isn’t without its hurdles. Let’s understand the potential “roadblocks” before you begin. It will help you build a more realistic timeline and avoid costly mistakes during the migration process.
One of the most significant challenges is mapping your existing content to Webflow’s CMS Collections. Unlike platforms like WordPress, which are often quite “loose” with data structures, Webflow requires a defined schema.
If your old site uses nested categories, complex multi-author relationships, or hundreds of custom fields, you may find that a simple CSV export isn’t enough. You’ll need to carefully architect your Webflow Collections to mirror your old data while staying within Webflow’s field limits. Failing to plan this structure early can result in “broken” content relationships that are difficult to fix once the site is live.
The “migration dip” is a very real concern for established businesses. When you move to Webflow, your site’s underlying code, speed, and often its URL structure change simultaneously. Even with a perfect 301 redirect strategy, search engines need time to crawl and re-index the new environment.
The challenge lies in ensuring that metadata, alt text, and header hierarchies remain consistent. If these elements are neglected during the transition, you risk losing the keyword authority you’ve spent years building, leading to a temporary drop in organic traffic.
If you are coming from a plugin-heavy ecosystem like WordPress or Shopify, you might be surprised to find that Webflow doesn’t always have a “one-click” solution for every niche feature. While the Webflow App Marketplace is growing, some specialized functionality requires third-party tools such as Zapier, Make, or Finsweet Attributes. Bridging these gaps often requires a basic understanding of custom code or API logic, which can be a steep learning curve for teams used to clicking “Install Plugin simply.”
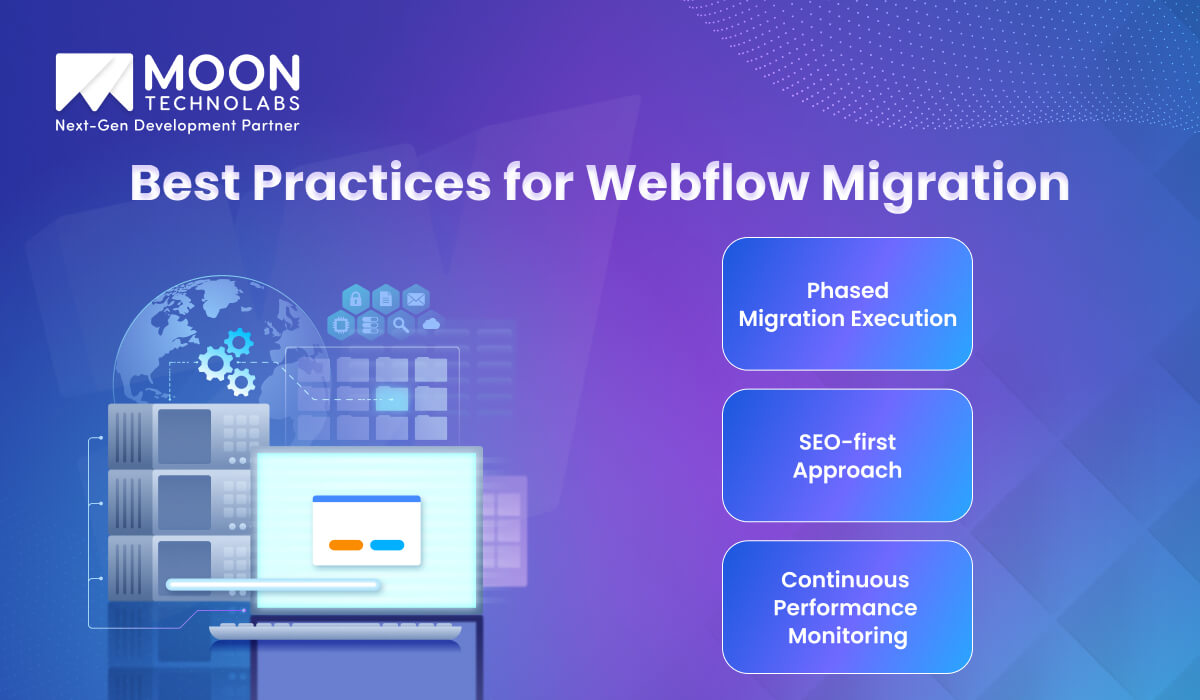
A successful migration to Webflow is the outcome of a disciplined, strategic process. Follow the industry best practices to transform technical transition into a seamless upgrade that elevates your brand’s digital presence without compromising data.
For larger websites, the “all-at-once” approach can be risky and overwhelming. A phased migration allows you to move your site in manageable stages, such as starting with a landing page or a specific blog section before transitioning the entire architecture. This “crawl, walk, run” strategy gives your team time to get comfortable with the Webflow Designer and CMS logic while identifying potential issues in a controlled environment. By launching an MVP first, you can gather real-world user feedback and make iterative improvements. This ensures that the final deployment is polished and battle-tested.
SEO must be the foundation of your migration plan. An SEO-first approach involves auditing your current site’s high-performing pages and keyword rankings before a single element is designed in Webflow.
This involves creating a comprehensive URL redirect map, preserving your heading hierarchy, and improving meta descriptions and alt text. By treating your site’s search visibility as a non-negotiable asset, you minimize the risk of post-launch traffic drops. It also ensures that Google recognizes your new Webflow site as a faster, more authoritative version of the original.
Smooth migrations rely on continuous testing before and after publication. During the build, use Webflow’s staging domain to run frequent Lighthouse audits and check your Core Web Vitals. Once the site is live, transition to active monitoring. Monitor Google Search Console for any unexpected 404 errors, and use tools such as Hotjar or Google Analytics to track user interactions with the new interface. This proactive stance allows you to catch and fix minor bugs before they impact your conversion rates or search rankings.
We simplify transitions with our comprehensive Webflow development services and a structured, end-to-end strategy. Our team of expert developers and SEO specialists ensures that your data, design, and search rankings remain fully intact. We handle everything from complex CMS mapping and 301 redirect implementation to performance tuning and custom third-party integrations.
By prioritizing a “zero-downtime” approach, we safeguard your organic traffic while significantly upgrading your site’s speed and mobile responsiveness. Whether you are migrating from WordPress, Shopify, a custom-built platform, or a webflow alternative, Moon Technolabs provides the technical precision needed to turn your migration into a powerful digital upgrade.
Don’t let technical complexities hold your business back. Our Webflow experts handle the heavy lifting, ensuring a seamless transition that elevates your brand.
Get Your Migration Roadmap
If your current WordPress setup is starting to feel more like a limitation than a foundation, you’re not alone. Moving from the “plugin-heavy” environment of WordPress to the streamlined efficiency of Webflow is a strategic investment in your brand’s future. By following the roadmap and best practices we’ve shared, you can finally achieve a site with clean, bloat-free code, unparalleled design flexibility, and the high-performance metrics that drive better SEO rankings and higher conversion rates.
Leave the technical headaches behind because our team at Moon Technolabs specializes in precision migrations that protect your data while elevating your user experience. With decades of collective technical expertise, we ensure your transition is seamless and stress-free. Beyond the launch, we provide comprehensive training for your team, empowering you to manage and scale your Webflow site with total confidence.
01
02
03
04
05

Jayanti Katariya is the CEO of Moon Technolabs, a fast-growing IT solutions provider, with 18+ years of experience in the industry. Passionate about developing creative apps from a young age, he pursued an engineering degree to further this interest. Under his leadership, Moon Technolabs has helped numerous brands establish their online presence and he has also launched an invoicing software that assists businesses to streamline their financial operations.
Submitting the form below will ensure a prompt response from us.
We refine our expertise to deliver innovative business solutions.


500 N Michigan Avenue, #600, Chicago IL 60611
13500 Long Is Dr, Pflugerville, TX 78660, USA
C-105, Ganesh Meridian, S.G. Highway, Ahmedabad, GJ 380060
Ayse D.
Co-Founder“ I highly recommend Moon Technolabs as the quality of service is wonderful. We have hired this company to develop the product based on some complex & technical issues. We get the best quality services as compared with others in the market. Huge Thanks to Moon Technolabs as the team is always ready to give the solution all time.”
Justin G.
Founder & CEO“ Moon Technolabs is a pioneer in the WebRTC based project as they have fixed complicated segments of the module by fulfilling different product lines by providing 24X7 customer support. We really recommended Moon Technolabs as they are able to develop products as per the module deadline and project timeline.”
Flavio S.
Founder & Managing Director“I am happy to recommend Moon Technolabs for their app development services. They successfully developed apps for me, and I am highly satisfied with the overall outcomes. The development team has swiftly addressed the issues with responsive and effective communication to understand the requirement quickly and actively resolve the back-and-forth problems that arose...”
Jay M.
Founder & CEO“Moon Technolabs is the best company that provides advanced apps and websites development services in the USA and Europe. I am a newbie to develop my app with an external team. I am really happy to work with them as I am not that much mobile apps user. Here, the team and specially the CEO of Moon Technolabs helps me to let me know about the benefits of my app to generate revenue....”


Our Offices
India
C-105, Ganesh Meridian, S.G. Highway, Ahmedabad, GJ 380060USA
500 N Michigan Avenue, #600, Chicago IL 60611Contact Information